
Last Updated on January 11, 2023 by TechChecking
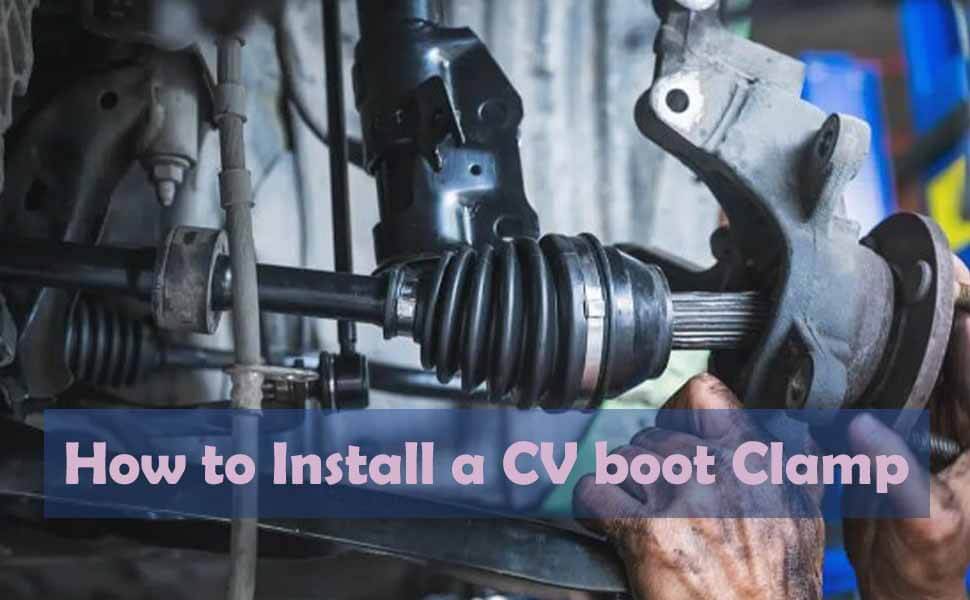
With proper tools, installing a CV boot clamp is truly easy. If you have cars or vehicles like these should know how to install a CV boot clamp because it may need in case of emergency. So, you should learn to use a cv boot clamp if you need to change bool clamps. You must know the best CV boot clamp tools to make your job done easier and smooth.
Owning a cv boot clamp tool is good for every vehicle owner. This tool can help to get the job done quickly and smoothly. Remember, without a proper tool, there will have a greater possibility to get damaging your cv boot and axle. So be careful while you are going to install a cv boot clamp with or without a cv boot clamp tool.
Contents
Types of CV Boot Clamp Tool
The CV joint boot clamp tool is usually used to install cv joint boot clamps smoothly and easily. There are different types of CV boot clamp tools in the market but, you can find mainly two types of tools for these kinds of jobs. They are:
- CV boot band clamp tool
- CV boot clamp pliers
If you know about them, that’s great. But if you don’t you should need to know. Anyways, we are going to discuss both of them here.
CV boot band clamp tool – the CV boot band tool is usually used on the band-style clamps. To be truthful, these types of clamp tools are very common. They are very easy to install as well. In these band-style clamps, you will find two different mechanisms. A clamp winder and clamp cutter.
In addition, there is a handle on the side of the CV boot banding tool. It operates the winding mechanism to tension the clamp.
CV boot clamp pliers – the CV boot clamp pliers, on the other hand, are kind of pliers or pincers. These types of tools are good to install ear or crimping style clamps. However, there is also a version of this tool for earless clamps. So you can choose the best type of tool you need to do the job.
Step By Step Guide to Install a CV Boot Clamp with CV Boot Clamp Banding Tool
Step 1: First of all what you need to do is undo the band clamp and then wrap it carefully around the CV boot. While doing it, make sure that it is set on the existing groove properly on the boot, or else the installation won’t be successful. However, now pull the free end of the clamp and tighten it around the boot so that it is done perfectly.
Step 2: Now is the time to insert the extended part of the clamp into the tool. Slide it now carefully with the help of a cutter, winder, and up to the end. As now you have inserted the whole clamp, bend it slightly by pulling the clamp over the end of the cv boot clamp banding tool.
Step 3: At this stage, you need to tighten the clamp. So, do it by turning the winder until you see the head of the tool touches the clamp around the boot using the CV boot clamp tool. However, you should give one more final turn in order to fit the clamp perfectly.
Step 4: Now, flip over the boot clamp tool. You can now see the clamp’s tail bending over the buckle-like clip. Now, use the cutting lever to nip the excess part of the band. This will release the tool and the clamp installation process is almost complete.
Step 5: At this finishing part, you need to use a needle-nose plier. Now, bend the clamp’s tabs in such a way that they are pressed against the bent part. You can now use a hammer to gently tap the tabs down. See, your CV boot clamp is now successfully installed. This is one of the few cv joint boots. So, follow the same techniques or steps with the clamp for the rest of the CV joint boot.
We have now learned how to install a cv boot clamp using the cv boot clamp tool. Now, we will learn how to install a cv boot clamp using a cv boot clamp plier.
How to Install a CV Boot Clamp Using a CV Boot Clamp Pliers
We know the CV boot clamp pliers are used to install ear clamps. The tool looks like it and works as a pincer-style head to tweak the part of the clamp to move the centerpiece forward to flatten the squeezed section. This method is easy too. You can now see below to learn how to use CV boot clamp pliers.
Step 1: Once you are ready with your tools and instrument, try to insert and position it around the boot carefully. The adjustment must be perfect. So be sincere about it while you are installing a cv boot clamp using pliers.
Step 2: Now, squeeze the raised part of the clamp in order to reduce the clamp’s diameter so that you can make it wrap around the boot tightly. This is how it works.
Step 3: Finally, inspect the clamp carefully to make sure it worked properly. In addition, check the procedure to whether the clamp is adequately securing the boot or not. If you have any doubt, reinstall it and make it perfect.
Can you replace CV boot without removing Axle?
CV boot replacement is really easy. Yes, they are easy when you are using tools and removing axle. The question is – can you replace cv boot without removing axle? Some new mechanics ask – can I replace cv boot without removing axle? Well, these are very simple questions. Besides, some more frequent questions are like how often should cv axles be replaced, what happens if you don’t replace cv boot, how to do inner cv boot replacement without removing axle, can I make the cv boot repair without removing axle, and so on.
Let’s now learn the CV boot replacement without removing axle. There are some steps that you must follow to perform the task. This is why you should need some cv boot replacement kits. Well, if you can’t fix it by yourself, you can search on the internet writing cv boot replacement near me. You will find one.
Anyways, we will now learn how can you replace cv boot without removing axle. We will maintain some steps.
Step 1: Remove the Wheel
What you need to do first is remove the wheel of the vehicle. To do this, using chock would be a good and reliable tool. Chock can strictly resist moving backward while you are working on it.
You can now bring out your CV boot repair kit and start working on the replacement. Use a jack preferably a portable hydraulic jack that can help you lift the vehicle. Remember that, this jack is included in the boot replacement kit.
However, to hold your vehicle still, it is necessary to use some cardboard or old towels under the car to avoid spreading the grease. In addition, to support the weight of the car, you must make sure to place the safety stands below it. Aside from this, you can use someone to put pressure on the brakes so that you can loosen the lug nuts by using the wrenches easily.
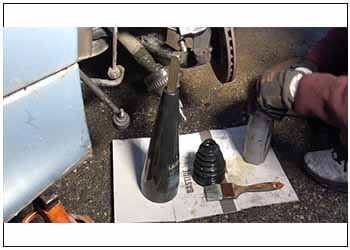
Step 2: Remove Broken CV Boot
If you are not an experienced one, you should keep the parts in groups in detachable order to avoid confusion. Due to different types of nuts and screws, this confusion can be created. So, take this advice cordially. For an experienced mechanic, it is so simple.
Now, gather some CV Boot Clamp Tools. Needle-nose pliers, socket wrench, screwdriver, razor blade, wire cutters, and plastic or wooden hammer. Needle-nose plier is for bending the pins; the socket wrench is to loosen the castle nut; the hammer would be used for detaching it completely. So, these tools are necessary.
After collecting the tools, move on to the next stage by disconnecting the stabilizer bar linkage. So, how to do this? Well, simply disassemble the standard bolts from both ends.
Next, to do cv boot replacement without removing axle, you need to remove the lower arm bolt. Try to use a plastic or wooden hammer to tap the lower control arm. And eventually, the pin will be released from the steering knuckle.
After those great efforts, as soon as the pin falls off, you will see the entire steering knuckle can move freely. At this stage, pull it out gently until there is enough space for you to remove the axle from the splined hole.
It is empty to see the old boot by now. However, to replace cv boot without removing axle, it would be great to remove the old tape with a screwdriver or pliers in advance.
Well, you can now cut the old boot off with a razor blade.
Step 3: Clean the Axle and Joints
Now, to clean the dirt and debris outside the boot, use a clean soft old towel or soft tissues to wipe them off. You may already know if you have experience, that the old grease is quite tough to deal with.
Well, use a cleaner (a cleaning solvent) that contains acetone. If you see any residue left, you can spray on it to remove it completely.
Step 4: Install New CV Boot Parts
Well, now is the time to install a new cv boot part. However, before installing the cv boot part, you have to do some important tasks. The first step of it is joint greasing. Where can you find it? Don’t worry, when you will buy the CV boot kits, greasing packages also come with them. So, take the grease and start applying on cv boot parts.
Now, that moment comes to installing the new part. You can already see, that there are cuts on the CV boot groves. Open them now and place the boot part over the axle area. Once done this part successfully, you can take out glue from the CV boot kit. The purpose to use the glue is to join both ends of the cv boot. So, when this task is completed, wait some time to dry the glue completely. After some time, you will see this glue turn into an elastic rubber-like material.
At this stage of the installation process, you have to grease the cv axle including the inside area of the new cv boot. These greases are used so that it works well and lasts longer and resists any future damage to the joints.
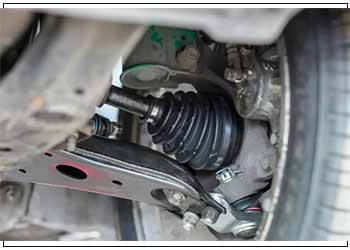
Step 5: Placement of New CV Boot
Now, the final phase comes. If you have already successfully completed the CV joint boot repair and installation, it is high time you moved the new boot to its right place. There are two sides or ends of the cv boot named the shorter side of the CV boot and the larger side of the cv boot. However, the shorter side of the cv boot comes in contact with the axle shaft area, while the larger end goes with the outer joint area. If you carefully observe, you can easily find out the grooves on both ends. Well, the grooves you found can be used as an indication that which side will fix which area.
Al last, take out the clamp pliers from the kit and install the metal clamps in their place. This is how you can replace a cv boot without removing the axle.
Can you reuse the CV boots clamp?
The pretty straight answer to this question is yes, you can reuse the cv boot clamp unless it is damaged, broken, cracked, or worn out. If the clamp is good, it would be fit for reuse. CV boot clamps tend not to damage frequently so you can reuse them if it is still undamaged. Anyways, you must have to check the clamp thoroughly so that you can know whether the clamps need to be changed or not.
Can you install a CV boot clamp without a tool?
Being a DIY enthusiastic, you may be wondering if there is a chance to change a CV axle boot clamp without the tool’s help. There are things that you can find easy alternatives but some are adamant to stay in the process.
A CV boot clamp installation without any tool’s help is quite unimaginable. The boot clamp you are going to install in a car or other vehicles may face a disastrous situation if it is not installed correctly, perfectly, and strongly. A little mistake or weak setting can destroy lives causing accidents. So, you can understand the depth of installing a CV boot clamp with or without a tool.
Besides, you can damage the rubber boot by not using the right tools. Excessively tightening or loosening the band may not be able to tension the band clamp as required.
As we know, CV joints are important parts of your car, it is required to sincerely and carefully install the cv boots in order to remain secure even as the axle spins. However, the CV clamps ensure that security once it is properly installed using a specialized CV boot clamp tool.
How do you use CV boot clamp pliers?
CV boot clamp pliers are essential tools for repairing or replacing cv boot clamps from vehicles. However, if you have already placed the boot clamp around the CV boot, now grab a Lisle CV boot clamp plier and use it properly. You can use the plier’s metal grip to hook the end of the boot clamp and then pull it outward until it’s tightly fixed on the boot clamp. After doing this, you must make sure whether it’s tight enough or not. In addition, you must bend the free end of the clamp over the metal clasp. To be noted, applying pressure too much or little can be disastrous and can cause fatal accidents. So, be careful about tightening cv boot clamps using cv boot clamp pliers.
Final Words
If you are new to this repair shop, you must know how to install a cv boot clamp by yourself. It is very easy with the help of some tools. If you find no tools near your hand, you sometimes need to do the cv boot replacement without removing axle. CV boot replacement kit can help you out from this inconvenient situation. So, if you know how to install a cv boot clamp, especially the cv boot replacement without removing axle, it means you are getting smarter and more professional.
Besides this, you must know how often replace the cv axle, how often should cv axles be replaced, what happens if you don’t replace the cv boot, inner cv boot replacement without removing axle, cv axle replacement boot, and so many questions like these. Install cv boot clamp perfectly and this is how you can avoid the danger that could cause from the cv boot.
You May Like –
- Scaffolding Clamps
- Different types of clamps for pipes
- How to Cut Wire Rope Cleanly [Step by Step Guide]
- 7 Best Wire Cutters for Electricians
- Socket Wrench vs Ratchet – Core Differences
Image Credit:
- https://carlawn.com/cv-boot-replacement-without-removing-axle/
- https://www.manorracing.com/cv-boot-replacement-without-removing-axle/